GranOO's install guide
The current stable version of GranOO is the 2.0. Note that this guide is related to this version. However if you want to
install the unstable 3.0 version, just substitute 2.0 by 3.0 in the following commands.
GranOO is coded in C++. It depends on the following C++ libraries : boost, zlib, qt5, eigen3 and vtk6. The sources of GranOO are managed by svn and the compilation process is assisted bycmake. After installation, you can go to the tutorial section to learn the basic usage of the workbench. We recommend to install GranOO on the last GNU/Linux Ubuntu LTS system.
- Install the required dependencies for Debian based distributions.
sudo apt install subversion cmake build-essential libboost-all-dev qt5-qmake libqt5opengl5-dev libeigen3-dev libvtk6-dev libsuitesparse-dev libopenblas-dev libmetis-dev- Install the required dependencies for CentOS based distributions.
sudo yum install epel-release subversion cmake3-gui freeglut-devel gmp-devel mpfr-devel boost-devel qt5-qtbase-devel eigen3-devel
# install vtk7
cd /opt/source/ && wget http://www.vtk.org/files/release/7.1/VTK-7.1.0.tar.gz
tar xvfz VTK-7.1.0.tar.gz && cd VTK-7.1.0/
cmake3 . && make && make install- Install the required dependencies for Fedora based distributions.
sudo dnf install subversion boost-devel cmake gcc-c++ qt5-devel vtk-devel eigen3-devel boost-python2-devel- Install the required dependencies for macOS. Note that you probably need to install Xcode and Homebrew.
brew install subversion
brew install git cmake boost qt eigen homebrew/science/vtk
brew link --force qt- Download the GranOO sources. Note that sources are managed by svn. If you are asked for a password just type
anonsvn.
cd somewhere
DIR=$PWD
mkdir -p granoo/tags && cd granoo/tags
svn checkout https://subversion.renater.fr/anonscm/svn/granoo/tags/2.0- Following the standard cmake install procedure, create a
buildand aninstalldirectories.
mkdir $DIR/granoo/tags/2.0/build
mkdir $DIR/granoo/tags/2.0/install- Compiling GranOO with cmake and make…
cd $DIR/granoo/tags/2.0/build/
cmake ../CMake -DCMAKE_INSTALL_PREFIX=$DIR/granoo/tags/2.0/install/
make && make install
You can take a coffee here !
- Adding the GranOO installation directory to your logging environment.
echo 'export GRANOO_INSTALL_DIR='$DIR'/granoo/tags/2.0/install/GranOO/2.0' >> ~/.bashrc
echo 'export PATH=$PATH:$GRANOO_INSTALL_DIR/bin' >> ~/.bashrc
echo 'export PYTHONPATH=$PYTHONPATH:$GRANOO_INSTALL_DIR/python' >> ~/.bashrc
echo 'export CMAKE_PREFIX_PATH="'$DIR'/granoo/tags/2.0/install/GranOO/2.0/"' >> ~/.bashrc
source ~/.bashrc- Checking installation by running an example.
cd $DIR/granoo/tags/2.0/Example/Granular/Rain/
mkdir build && cd build/ && cmake ../ && make && cd ../
./build/rain.exe ./Rain.inp
granoo-viewer ./Results/
If you see a 3D graphical interface that shows this simulation, it means that the install is right ! You can go now to the tutorial section to learn GranOO.
How to fix the TPL_PATH-NOTFOUND error
If you experienced the following error
TPL_PATH-NOTFOUND/cmake/CMakeLists-Make-App.txtIt means that cmake is not able to locate your GranOO installation path. You must help cmake to locate GranOO.
So, instead of invoking cmake as this
cmake ../ You must invoke cmake with
cmake -D CMAKE_PREFIX_PATH="/path/to/your/granoo/install/GranOO/2.0/" ../ If you want to fix definitively this error, you can add this environment
variable to your .bashrc file as it follows
echo 'export CMAKE_PREFIX_PATH="/path/to/your/granoo/install/GranOO/2.0/"' >> ~/.bashrc
source ~/.bashrc
In the above code, don’t forget to substitute /path/to/your/granoo to your real
GranOO location.
Installing GranOO natively on Windows is so long and complicated that your best choice is to use WSL, which stands for “Windows Subsystem for Linux”. It consists in installing a virtual, but nevertheless quite powerful, machine (depending on the physical host).
Install WSL (Windows Subsystem for Linux)
Follow the step by step guide provided by Microsoft here. We recommand to install a Ubuntu distribution so that the following step is straightforward.
Build and install GranOO
Follow the step by step guide provided by the GranOO team for Ubuntu/Debian distributions.
X server
The last step, if you plan to use GUI in the Linux system, is to install an X server. Again, we recommand to install VcXsrv, which is quite easy to use. VcXsrv can be downloaded from here.
Finally, in the Linux virtual machine, edit your .bashrc file:
nano /home/<username>/.bashrc
and add the display address at the end of the file:
export DISPLAY=:0.0
GranOO is now ready to use !
This tutorial was written for the following tools and dependencies versions: Microsoft Visual Studio Community 2015 Update 3, ConEmu 16.12.06 & Clink 0.4.8, CMake 3.10.2, svn 1.8.17, zlib 1.2.11, boost 1.65.1, Qt 5.9.2, VTK 8.0.1 and Eigen 3.3.2. First, you need to install all these required dependencies.
Install Microsoft Visual Studio Community
- Download it from the following link
- Run the installer and select “Custom” for the installation type
- Select only Programming Languages -> Visual C++ -> Common Tools for Visual Studio C++ 2015
Install ConEmu & Clink
This step is not mandatory, but it improves the experience of the default Windows command line tool. Clink improves the tab completion, and ConEmu handles tabs and colours (among other interesting features).
- Download ConEmu from the following link
- Download Clink from the following link
- Install both of them (default installs)
Install Subversion
- Download Subversion from the following link
- Install Subversion (default install)
- After the installation completes, if needed, configure your proxy server in the
[global]section of theserversfile, located atC:\Users\<UserName>\AppData\Roaming\Subversion
Install CMake
- Download CMake from the following link
- Install CMake (default install)
Prepare your build environment
Create the project tree :
- Create a folder named
DeveloperinC:\ - Create 3 subfolders named
Sources,BuildandInstallin theC:\Developerdirectory
Configure ConEmu for 64bit systems:
- Start ConEmu and, if prompted at ConEmu startup, select
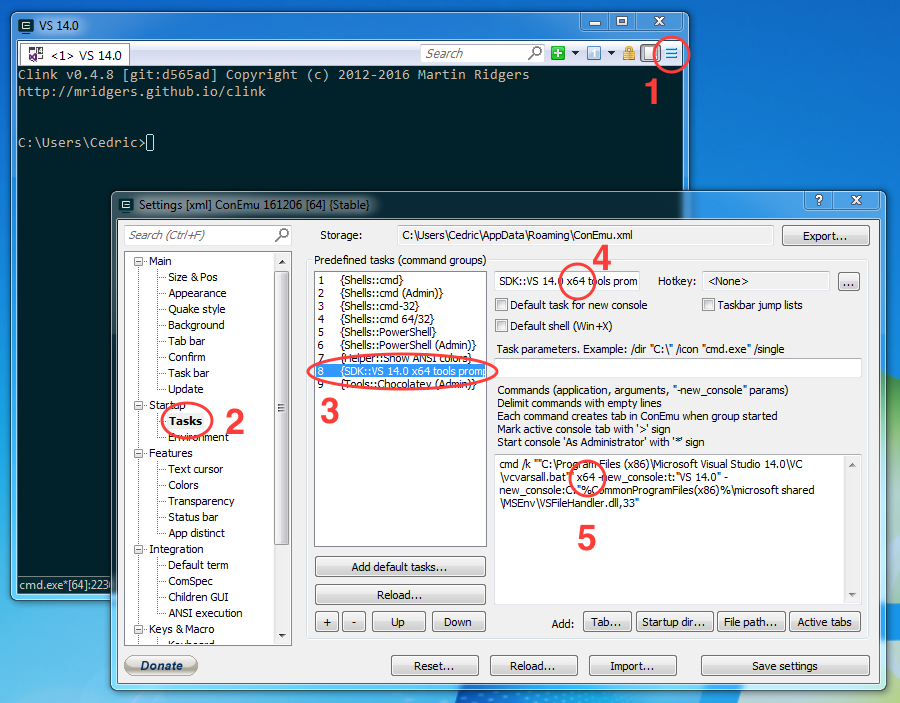
SDK::VS 14.0 x86 tools promptas startup task - If not prompted at startup, go to ConEmu Settings -> Startup -> Tasks (see task (1), (2) and (3) on this screenshot)
- Change the configuration name from
...x86...to...x64...( see task (4) on this screenshot) - In the commands list, change
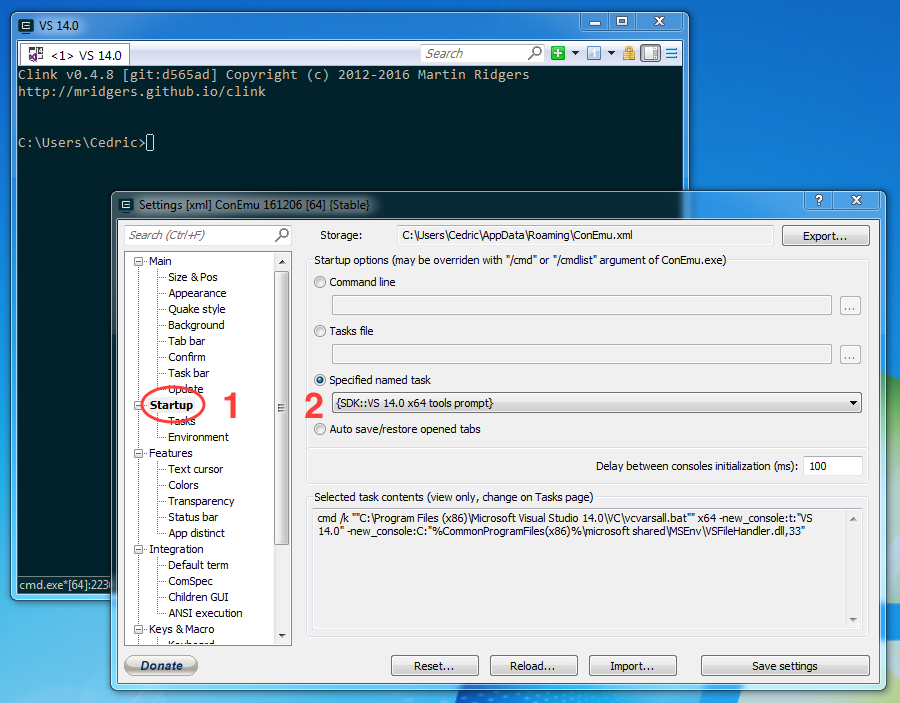
x86tox64(see task (5) on this screenshot) - In ConEmu Settings -> Startup, select
SDK::VS 14.0 x64 tools promptas “Specified named task” (see (1) and (2) on this screenshot) - Save settings
Download zlib
zlib will be used by Boost to compile the [lib| ]boost_zlib.[lib|dll],
which is required by GranOO for classes serialization.
- Download the
.ziparchive of zlib sources - Extract the downloaded
.ziparchive inC:\Developer\Sources
Build and install Boost
- Download the
.ziparchive from this link - Extract the downloaded
.ziparchive inC:\Developer\Sources - In ConEmu, move into
C:\Developer\Sources\boost_1_65_1 - Type the following commands to create (bootstrap) the builder, build and install boost:
bootstrap.bat
b2 -j 2 --build-type=complete --build-dir=C:\Developer\Build toolset=msvc variant=debug,release runtime-link=shared,static threading=single,multi address-model=64 -sZLIB_SOURCE=C:\Developer\Sources\zlib-1.2.11 --prefix=C:\Developer\Install install
Install Qt5
- Download the installer for Windows x64 and msvc2015
- Run the installer and type
C:\Developer\Install\Qt-5.9.2as install path (may be adjusted according to the version number) - The minimal configuration for GranOO is to select the
msvc2015 64bitcomponent. All other components are not mandatory.
Build and install VTK
- Download the
.ziparchive of VTK sources from: http://www.vtk.org/download - Extract the downloaded
.ziparchive inC:\Developer\Sources - In ConEmu, move into
C:\Developer\Build, create a folder namedvtk, and move into it - Type the following command to configure VTK
cmake -G "NMake Makefiles" ..\..\Sources\VTK-8.0.1\ -DCMAKE_INSTALL_PREFIX:PATH=C:\Developer\Install- Type the following build and install VTK
nmake
nmake install
Install Eigen3
- Download the
.ziparchive of Eigen3 sources from: http://eigen.tuxfamily.org - Extract the downloaded
.ziparchive inC:\Developer\Sources - In ConEmu, move into
C:\Developer\Build, create a folder namedeigen, and move into it - Type the following command to configure Eigen3
"C:\Program Files\CMake\bin\cmake" -G "NMake Makefiles" ..\..\Sources\eigen-eigen-da9b4e14c255\ -DCMAKE_INSTALL_PREFIX:PATH=C:\Developer\Install- type the following to install Eigen3
nmake
nmake install
Download, build and install GranOO
- In ConEmu, move into
C:\Developer\Sources - To download the GranOO sources, type the following command:
svn checkout https://scm.ff-m2p.cnrs.fr/anonscm/svn/granoo/- Once the sources are downloaded, move into the build directory, and create a GranOO build directory:
cd C:\Developer\Build
mkdir -p granoo/tags && cd granoo/tags
svn checkout https://scm.ff-m2p.cnrs.fr/anonscm/svn/granoo/tags/2.0- Configure the GranOO build using CMake. Here, we will build the 2.0 version:
"C:\Program Files\CMake\bin\cmake" -G "NMake Makefiles" ..\..\Sources\granoo\tags\2.0\CMake -DCMAKE_INSTALL_PREFIX:PATH=C:\Developer\Install -DCMAKE_BUILD_TYPE:STRING="Release" -DBoost_USE_STATIC_LIBS:BOOL=ON -DCMAKE_PREFIX_PATH:PATH=C:\Developer\Install\Qt-5.9.2\5.9.2\msvc2015_64;C:\Developer\Install\include- When the configuration is done, build and install GranOO:
nmake
nmake install
As it is stated in the CMake configuration command, GranOO is now installed in C:\Developer\Install. The GranOO binaries are located in C:\Developer\Install\GranOO\2.0\bin, and the GranOO library is in C:\Developer\Install\GranOO\2.0\lib.
The last step is to add the GranOO installation directory to your environment variables
GRANOO_INSTALL_DIR=C:\Developer\Install\GranOO\2.0GranOO is now ready to use !